Tensil tutorial for YOLO v4 Tiny on Ultra96 V2
Introduction
This tutorial will use Avnet Ultra96 V2 development board and Tensil open-source inference accelerator to show how to run YOLO v4 Tiny–the state-of-the-art ML model for object detection–on FPGA. The YOLO model contains some operations that Tensil does not support. These operations are in the final stage of processing and are not compute-intensive. We will use TensorFlow Lite (TF-Lite) to run them on the CPU to work around this. We will use the PYNQ framework to receive real-time video from a USB webcam and show detected objects on a screen connected to Display Port. This tutorial refers to the previous Ultra96 tutorial for step-by-step instructions for generating Tensil RTL and getting Xilinx Vivado to synthesize the bitstream.
If you get stuck or find an error, you can ask a question on our Discord or send an email to support@tensil.ai.
Overview
Before we start, let’s get a bird’s eye view of what we want to accomplish. We’ll follow these steps:
- Generate and synthesize Tensil RTL
- Compile YOLO v4 Tiny model for Tensil
- Prepare PYNQ and TF-Lite
- Execute with PYNQ
1. Generate and synthesize Tensil RTL
In the first step, we’ll be getting Tensil tools to generate the RTL code and then using Xilinx Vivado to synthesize the bitstream for the Ultra96 board. Since this process is identical to other Ultra96 tutorials, we refer you to sections 1 through 4 in the ResNet20 tutorial.
Alternatively, you can skip this step and download the ready made bitstream. For this we include instructions in the subsequent section.
2. Compile YOLO v4 Tiny model for Tensil
Now, we need to compile the ML model to a Tensil binary consisting of TCU instructions executed by the TCU hardware directly. The YOLO v4 Tiny model is included in two resolutions, 192 and 416, in the Tensil docker image at /demo/models/yolov4_tiny_192.onnx and /demo/models/yolov4_tiny_416.onnx. The higher resolution will detect smaller objects using more computation and thus have fewer frames per second. Note that below we will be using 192 resolution, but simply replacing it with 416 should work as well.
As we mentioned in the introduction, we will be using the TF-Lite framework to run the postprocessing of YOLO v4 Tiny. Specifically, this postprocessing includes Sigmoid and Exp operations not supported by the Tensil hardware. (We plan to implement them using table lookup based on Taylor expansion.) This means that for Tensil we need to compile the model ending with the last convolution layers. Below these layers, we need to compile the TF-Lite model. To identify the output nodes for the Tensil compiler, take a look at the model in Netron.
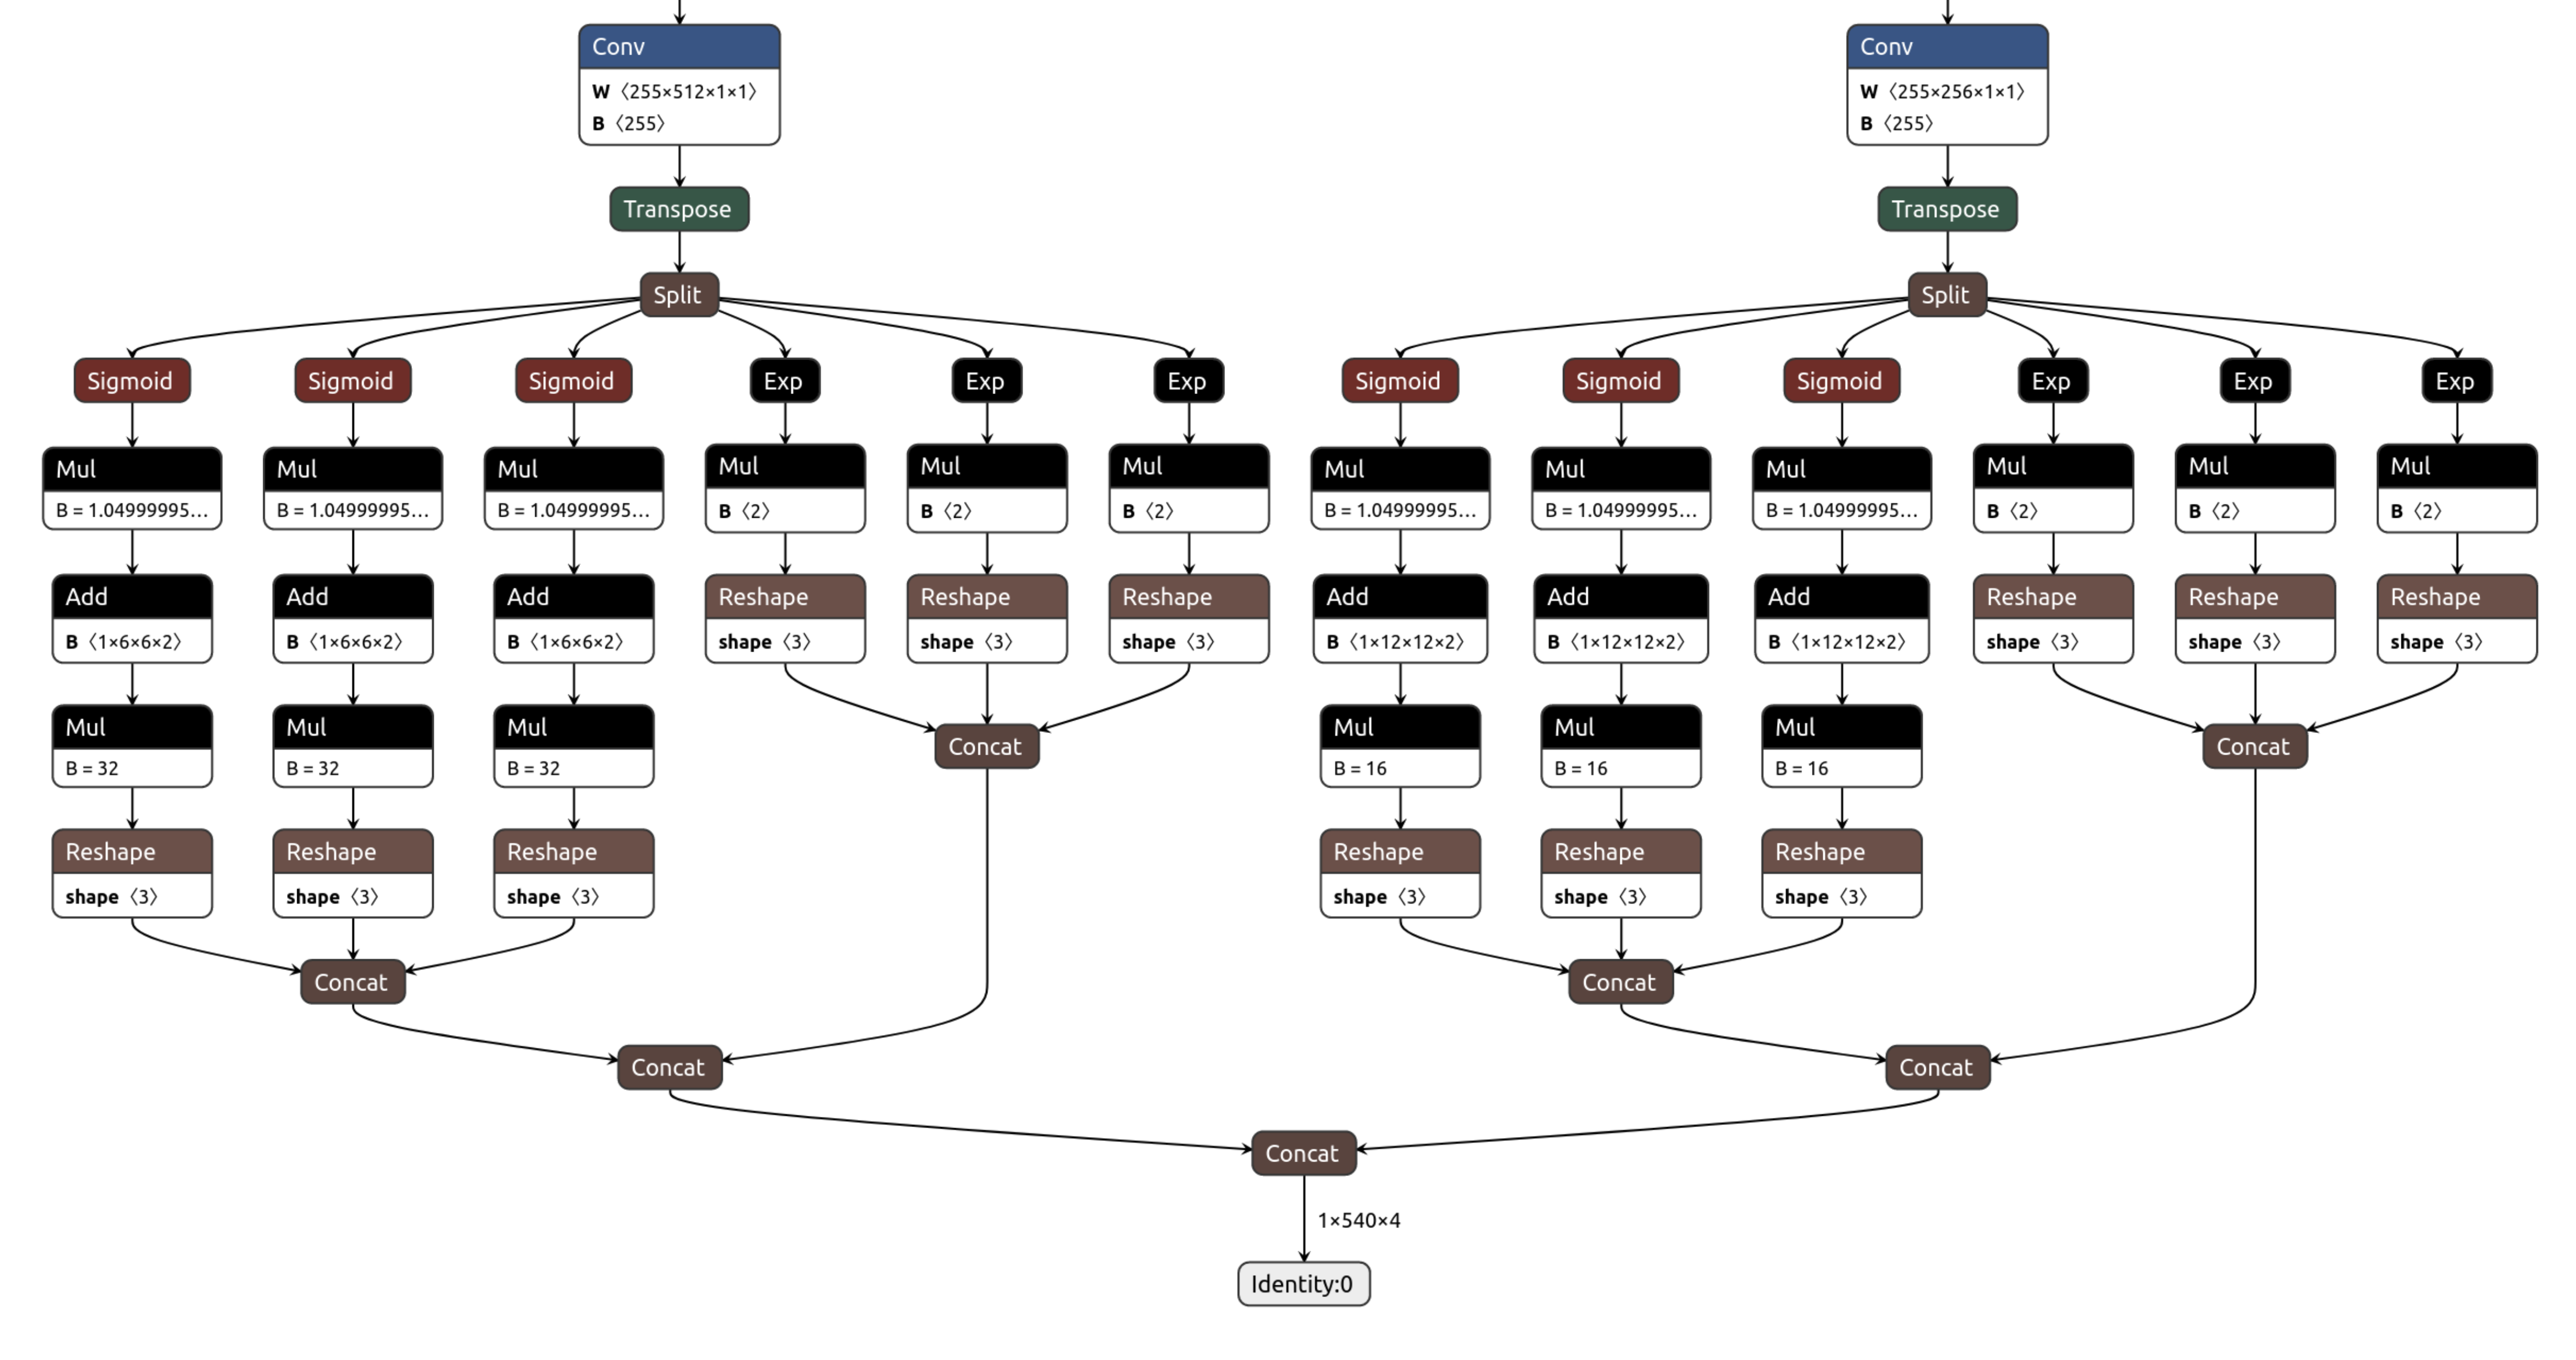
Two last convolution operation have outputs named model/conv2d_17/BiasAdd:0 and model/conv2d_20/BiasAdd:0.
From within the Tensil docker container, run the following command.
tensil compile \
    -a /demo/arch/ultra96v2.tarch \
    -m /demo/models/yolov4_tiny_192.onnx \
    -o "model/conv2d_17/BiasAdd:0,model/conv2d_20/BiasAdd:0" \
    -s true
The resulting compiled files are listed in the ARTIFACTS table. The manifest (tmodel) is a plain text JSON description of the compiled model. The Tensil program (tprog) and weights data (tdata) are both binaries to be used by the TCU during execution. The Tensil compiler also prints a COMPILER SUMMARY table with interesting stats for both the TCU architecture and the model.
---------------------------------------------------------------------------------------------
COMPILER SUMMARY
---------------------------------------------------------------------------------------------
Model:                                           yolov4_tiny_192_onnx_ultra96v2
Data type:                                       FP16BP8
Array size:                                      16
Consts memory size (vectors/scalars/bits):       2,097,152                      33,554,432 21
Vars memory size (vectors/scalars/bits):         2,097,152                      33,554,432 21
Local memory size (vectors/scalars/bits):        20,480                         327,680    15
Accumulator memory size (vectors/scalars/bits):  4,096                          65,536     12
Stride #0 size (bits):                           3
Stride #1 size (bits):                           3
Operand #0 size (bits):                          24
Operand #1 size (bits):                          24
Operand #2 size (bits):                          16
Instruction size (bytes):                        9
Consts memory maximum usage (vectors/scalars):   378,669                        6,058,704
Vars memory maximum usage (vectors/scalars):     55,296                         884,736
Consts memory aggregate usage (vectors/scalars): 378,669                        6,058,704
Vars memory aggregate usage (vectors/scalars):   130,464                        2,087,424
Number of layers:                                25
Total number of instructions:                    691,681
Compilation time (seconds):                      92.225
True consts scalar size:                         6,054,190
Consts utilization (%):                          98.706
True MACs (M):                                   670.349
MAC efficiency (%):                              0.000
---------------------------------------------------------------------------------------------
3. Prepare PYNQ and TF-Lite
Now it’s time to put everything together on our development board. For this, we first need to set up the PYNQ environment. This process starts with downloading the SD card image for our development board. There’s the detailed instruction for setting board connectivity on the PYNQ documentation website. You should be able to open Jupyter notebooks and run some examples. Note that you’ll need wireless internet connectivity for your Ultra96 board in order to run some of the commands in this section.
There is one caveat that needs addressing once PYNQ is installed. On the default PYNQ image, the setting for the Linux kernel CMA (Contiguous Memory Allocator) area size is 128MB. Given our Tensil architecture, the default CMA size is too small. To address this, you’ll need to download our patched kernel, copy it to /boot, and reboot your board. Note that the patched kernel is built for PYNQ 2.7 and will not work with other versions. To patch the kernel, run these commands on the development board:
wget https://s3.us-west-1.amazonaws.com/downloads.tensil.ai/pynq/2.7/ultra96v2/image.ub
sudo cp /boot/image.ub /boot/image.ub.backup
sudo cp image.ub /boot/
rm image.ub
sudo reboot
Now that PYNQ is up and running, the next step is to scp the Tensil driver for PYNQ. Start by cloning the Tensil GitHub repository to your work station and then copy drivers/tcu_pynq to /home/xilinx/tcu_pynq onto your board.
git clone git@github.com:tensil-ai/tensil.git
scp -r tensil/drivers/tcu_pynq xilinx@192.168.3.1:
Next, we’ll download the bitstream created for Ultra96 architecture definition we used with the compiler. The bitstream contains the FPGA configuration resulting from Vivado synthesis and implementation. PYNQ also needs a hardware handoff file that describes FPGA components accessible to the host, such as DMA. Download and un-tar both files in /home/xilinx by running these commands on the development board.
wget https://s3.us-west-1.amazonaws.com/downloads.tensil.ai/hardware/1.0.4/tensil_ultra96v2.tar.gz
tar -xvf tensil_ultra96v2.tar.gz
If you’d like to explore using Tensil RTL tool and Xilinx Vivado to synthesize the bitstream yourself, we refer you to sections 1 through 4 in the ResNet20 tutorial. Section 6 in the same tutorial includes instructions for copying the bitstream and hardware handoff file from Vivado project onto your board.
Now, copy the .tmodel, .tprog and .tdata artifacts produced by the compiler on your work station to /home/xilinx on the board.
scp yolov4_tiny_192_onnx_ultra96v2.t* xilinx@192.168.3.1:
Next, we need to set up TF-Lite. We prepared the TF-Lite build compatible with the Ultra96 board. Run the following commands on the development board to download and install.
wget https://s3.us-west-1.amazonaws.com/downloads.tensil.ai/tflite_runtime-2.8.0-cp38-cp38-linux_aarch64.whl
sudo pip install tflite_runtime-2.8.0-cp38-cp38-linux_aarch64.whl
Finally, we will need the TF-Lite model to run the postprocessing in YOLO v4 Tiny. We prepared this model for you as well. We’ll also need text labels for the COCO dataset used for training the YOLO model. Download these files into /home/xilinx by running these commands on the development board.
wget https://github.com/tensil-ai/tensil-models/raw/main/yolov4_tiny_192_post.tflite
wget https://raw.githubusercontent.com/amikelive/coco-labels/master/coco-labels-2014_2017.txt
4. Execute with PYNQ
Now, we will be tying everything together in PYNQ Jupyter notebook. Let’s take a closer look at our processing pipeline.
- Capture the frame image from the webcam;
- Adjust the image size, color scheme, floating-point channel representation, and Tensil vector alignment to match YOLO v4 Tiny input;
- Run it through Tensil to get the results of the two final convolution layers;
- Subsequently run these results through the TF-Lite interpreter to get the model output for bounding boxes and classification scores;
- Filter bounding boxes based on the score threshold and suppress overlapping boxes for the same detected object;
- Use the frame originally captured from the camera to plot bounding boxes, class names, scores (red), the current value for frames per second (green), and the detection area (blue);
- Send this annotated frame to Display Port to show on the screen.
At the beginning of the notebook, we define global parameters: frame dimensions for both camera and screen and YOLO v4 Tiny resolution we will be using.
model_hw = 192
frame_w = 1280
frame_h = 720
Next, we import the Tensil PYNQ driver and other required utilities.
import sys
sys.path.append('/home/xilinx/')

import time
import math
import numpy as np
import tflite_runtime.interpreter as tflite
import cv2
import matplotlib.pyplot as plt
import pynq

from pynq import Overlay
from pynq.lib.video import *

from tcu_pynq.driver import Driver
from tcu_pynq.util import div_ceil
from tcu_pynq.architecture import ultra96
Now, initialize the PYNQ overlay from the bitstream and instantiate the Tensil driver using the TCU architecture and the overlay’s DMA configuration. Note that we are passing axi_dma_0 object from the overlay–the name matches the DMA block in the Vivado design.
overlay = Overlay('/home/xilinx/tensil_ultra96v2.bit')
tcu = Driver(ultra96, overlay.axi_dma_0)
Next, we need to initialize the capture from the webcam using OpenCV library.
cap = cv2.VideoCapture(0)

cap.set(cv2.CAP_PROP_FRAME_WIDTH, frame_w);
cap.set(cv2.CAP_PROP_FRAME_HEIGHT, frame_h);
And initialze the Dispay Port.
displayport = DisplayPort()
displayport.configure(VideoMode(frame_w, frame_h, 24), PIXEL_RGB)
If you are connecting the board to an HDMI screen, make sure to use active DP-to-HDMI cable, such as this one.
Next, load the tmodel manifest for the model into the driver. The manifest tells the driver where to find the other two binary files (program and weights data).
tcu.load_model('/home/xilinx/yolov4_tiny_{0}_onnx_ultra96v2.tmodel'.format(model_hw))
Then, instantiate the TF-Lite interpreter based on YOLO postprocessing model.
interpreter = tflite.Interpreter(model_path='/home/xilinx/yolov4_tiny_{0}_post.tflite'.format(model_hw))
interpreter.allocate_tensors()
Now we load the COCO labels and define several utility functions.
with open('/home/xilinx/coco-labels-2014_2017.txt') as f:
    labels_coco = f.read().split('\n')

def set_tensor(driver, interpreter, hw_size, data):
    input_details = interpreter.get_input_details()
    input_idxs = [i for i in range(len(input_details))
                  if input_details[i]['shape'][1] == hw_size and input_details[i]['shape'][2] == hw_size]
    inp = input_details[input_idxs[0]]
    data = data.astype(inp['dtype'])
    inner_dim = inp['shape'][-1]
    inner_size = div_ceil(inner_dim, driver.arch.array_size) * driver.arch.array_size
    if inner_size != inner_dim:
        data = data.reshape((-1, inner_size))[:, :inner_dim]
    data = data.reshape(inp['shape'])
    interpreter.set_tensor(inp['index'], data)

def filter_and_reshape(boxes, scores, score_threshold=0.4):
    scores_max = np.max(scores, axis=-1)
    mask = scores_max > score_threshold

    filtered_boxes = boxes[mask]
    filtered_scores = scores[mask]

    filtered_boxes = np.reshape(filtered_boxes, [scores.shape[0], -1, filtered_boxes.shape[-1]])
    filtered_scores = np.reshape(filtered_scores, [scores.shape[0], -1, filtered_scores.shape[-1]])

    return filtered_boxes, filtered_scores


def non_maximum_suppression(boxes, iou_threshold=0.4):
    if len(boxes) == 0:
        return boxes

    area = (boxes[:, 2] - boxes[:, 0]) * (boxes[:, 3] - boxes[:, 1])
    ll_x = np.maximum.outer(boxes[:, 0], boxes[:, 0])
    ll_y = np.maximum.outer(boxes[:, 1], boxes[:, 1])
    ur_x = np.minimum.outer(boxes[:, 2], boxes[:, 2])
    ur_y = np.minimum.outer(boxes[:, 3], boxes[:, 3])
    intersection_x = np.maximum(0, ur_x - ll_x)
    intersection_y = np.maximum(0, ur_y - ll_y)
    intersection = intersection_x * intersection_y

    iou = intersection / area - np.identity(area.shape[-1])
    p = iou >= iou_threshold
    p = p & p.T
    n =  p.shape[-1]

    no_needs_merge = set()
    for i in range(n):
        if not p[i].any():
            no_needs_merge.add(i)

    needs_merge = set()
    for i in range(n):
        for j in range(n):
            if p[i, j]:
                needs_merge.add(tuple(sorted((i, j))))

    def merge(needs_merge):
        result = set()
        discarded = set()
        for indices in needs_merge:
            idx = indices[0]
            if idx not in discarded:
                result.add(indices[0])
            discarded.add(indices[1])
            if indices[1] in result:
                result.remove(indices[1])
        return result

    return sorted(list(no_needs_merge) + list(merge(needs_merge)))
Finally, we tie the pipeline together in a loop to process a fixed number of frames. (You may replace it with while(1): to run the pipeline indefinitely.)
for _ in range(600):
    start = time.time()

    cap_frame = displayport.newframe()
    cap.read(cap_frame)

    crop_h = int(max(0, (frame_h - frame_w) / 2))
    crop_w = int(max(0, (frame_w - frame_h) / 2))
    ratio_h = (frame_h - crop_h * 2)/model_hw
    ratio_w = (frame_w - crop_w * 2)/model_hw

    x_frame = cap_frame
    x_frame=x_frame[crop_h:frame_h - crop_h, crop_w:frame_w - crop_w]
    x_frame=cv2.resize(x_frame, (model_hw, model_hw), interpolation=cv2.INTER_LINEAR)
    x_frame=cv2.cvtColor(x_frame, cv2.COLOR_BGR2RGB)
    x_frame = x_frame.astype('float32') / 255
    x_frame = np.pad(x_frame, [(0, 0), (0, 0), (0, tcu.arch.array_size - 3)], 'constant', constant_values=0)

    inputs = {'x:0': x_frame}
    outputs = tcu.run(inputs)

    set_tensor(tcu, interpreter, model_hw / 32, np.array(outputs['model/conv2d_17/BiasAdd:0']))
    set_tensor(tcu, interpreter, model_hw / 16, np.array(outputs['model/conv2d_20/BiasAdd:0']))

    interpreter.invoke()

    output_details = interpreter.get_output_details()
    scores, boxes_xywh = [interpreter.get_tensor(output_details[i]['index']) for i in range(len(output_details))]

    boxes_xywh, scores = filter_and_reshape(boxes_xywh, scores)

    boxes_xy, boxes_wh = np.split(boxes_xywh, (2,), axis=-1)
    boxes_x0y0x1y1 = np.concatenate([boxes_xy - boxes_wh/2, boxes_xy + boxes_wh/2], axis=-1)

    box_indices = non_maximum_suppression(boxes_x0y0x1y1[0])

    latency = (time.time() - start)
    fps = 1/latency

    for i in box_indices:
        category_idx = np.argmax(scores, axis=-1)[0, i]
        category_conf = np.max(scores, axis=-1)[0, i]
        text = f'{labels_coco[category_idx]} = {category_conf:.2}'

        box_x0y0x1y1 = boxes_x0y0x1y1[0, i]
        box_x0y0x1y1[0] *= ratio_w
        box_x0y0x1y1[1] *= ratio_h
        box_x0y0x1y1[2] *= ratio_w
        box_x0y0x1y1[3] *= ratio_h
        box_x0y0x1y1[0] += crop_w
        box_x0y0x1y1[1] += crop_h
        box_x0y0x1y1[2] += crop_w
        box_x0y0x1y1[3] += crop_h
        box_x0y0x1y1 = box_x0y0x1y1.astype('int')

        cap_frame = cv2.rectangle(cap_frame, (crop_w, crop_h), (frame_w - crop_w, frame_h - crop_h), (255, 0, 0), 1)
        cap_frame = cv2.rectangle(cap_frame, (box_x0y0x1y1[0], box_x0y0x1y1[1]), (box_x0y0x1y1[2], box_x0y0x1y1[3]), (0, 0, 255), 1)
        cap_frame = cv2.putText(cap_frame, text, (box_x0y0x1y1[0] + 2, box_x0y0x1y1[1] - 2), cv2.FONT_HERSHEY_SIMPLEX, 0.75, (0, 0, 255))


    cap_frame = cv2.putText(cap_frame, f'{fps:.2}fps', (2, frame_h - 2), cv2.FONT_HERSHEY_SIMPLEX, 0.75, (0, 255, 0))
    displayport.writeframe(cap_frame)
After running the pipeline, we clean up the camera capture and Display Port resources.
displayport.close()
cap.release()
tcu.close()
Congratulations! You ran a state-of-the-art object detection ML model on a custom accelerator hooked to a webcam and a screen for real-time object detection! Just imagine the things you could do with it…
Wrap-up
In this tutorial we used Tensil to show how to run YOLO v4 Tiny ML model on FPGA with a postprocessing step handled by TF-Lite. We showed how to analyze the model to detemine the layers at which to split the processing between TF-Lite and Tensil. We included step-by-step explanation how to do real-time video processing pipeline using PYNQ.
If you made it all the way through, big congrats! You’re ready to take things to the next level by trying out your own model and architecture. Join us on Discord to say hello and ask questions, or send an email to support@tensil.ai.